


Senexis
Insiders
-
Joined
-
Last visited
Everything posted by Senexis
-

 If you don't see the menu at all it means the mod wasn't installed properly, or have another mod overriding this mod. Please make sure you installed the mod and LML correctly and don't have any mod conflicts, then try again.
 -
What exactly is the issue? What item, etc.?
-
@TungstnBallon @Practona This issue should be resolved in version 1.3.4. Please let me know if you find anywhere that's not the case!
-
Hey there, I'll look into this issue and post an update when it's resolved, I am currently working hard to get all remaining weapon bugs kinked out as those affect general gameplay. Please remain patient and, like I said, I'll take a look at it as soon as I can. 🙂
-
Easier Gold Medals This is a very simple mod that makes it easier for the leisurely folk to get Gold medals in the game for completing missions. This mod does two things and two things only (currently): Makes all timed challenges complete any time. Allows you to take your time when completing the missions, take a look around, enjoy the battlefield. Makes it so that failed attempts no longer reset challenges. Sometimes you just stroll around too much and you end up dying. No worries about lost challenge progress in this case! Note: The in-game challenge text will still mention the original times. This can be ignored as they are not directly related to the actual timers. To install, drop the easier_gold folder in the LML folder. Lenny's Mod Loader beta 6+ is required for this to function properly.
-
 Make sure, if you have the All items mod, to update both as the bug was present in both. Other than that, we've tested this with multiple types of objects and it does resolve the issue. If you made sure that no other mod has this effect, please report back with what exactly you're trying to do.
- 471 comments
- 12 reviews
-
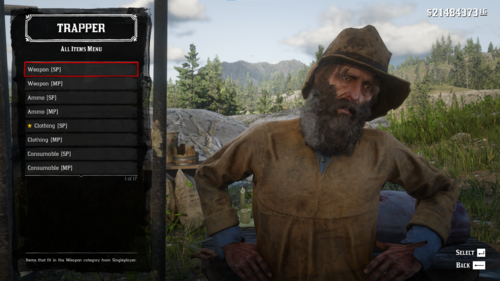
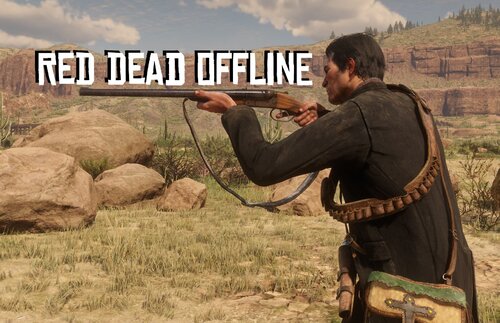
All items unlocked and purchasable Now fully compatible with Red Dead Offline! Make sure this mod overrides Red Dead Offline and you'll be good to go. Without Red Dead Offline installed, certain Multiplayer weapons will not be unlocked for purchase, in addition to making me sad that you didn't install it. Get it here! In this mod, changes are made to the catalog to allow you to buy and and all items without requirements. This is done by manually going through the catalog file and removing the restrictions put on the items that are locked, by adding them all to a custom menu at the Trapper. In addition, this makes every item always purchasable at Tailors, Newspaper Boys, General Stores, Trappers, Doctors, Pearson and the Bait store. This means that you can unlock items from those stores whenever you want. Newspaper Boys, for example, always sell every single issue of their newspaper, Trappers allow you to purchase the outfit before having crafted all individual pieces, Pearson allows you craft without needing the Crafting Tools from the Ledger, Tailors allow you to purchase all outfits from anywhere, and more. This functionality is intentionally not made available when customizing guns, at stables and at various barber shops, including the Camp Shaving kit. This is to prevent serious bugs from happening. This adds a custom menu to the Trappers around the world that allows you to buy any item. Adds multiple categories to the menu you can use. The mod adds a dedicated All Items Menu option in which all options are located. Some pages allow you to use Q and E to browse tabs within them. Please note that due to a limitation in the game, the tab indicated (the little circles) stop updating past a certain point, but the menus still work. Items that are normally not available for purchase have been given a purchase price of $0.01, while any item that already had a purchase price has been left untouched and will cost the same. NEW! In addition to the new custom menu at Trappers, this mod also allows you to sell any item that's located in your satchel by selling them to a Fence. Think documents, key items, unique items, and more. All items that are not intended to be sold will not give you cash for selling them. Any item with an original selling price has been left untouched and will sell for the same everywhere. IMPORTANT: Purchasing or selling items that are obviously not intended to be used in gameplay either by being cut or not intended to be purchased or sold may have lasting and unforeseen consequences on your save file. I have intentionally left everything in there so that you can have fun experiencing what would happen if you got or removed certain items early, et cetera, but this means there is a very real chance that progression using your save game may be permanently broken. If you are worried about purchasing or selling something that may break your game, do not buy items that are free, are sold for free, have missing text, or display anything weird. BACK UP YOUR SAVE, YOU HAVE BEEN WARNED! Installation Back up your save. There is a very real possibility your save will become damaged by using certain options in the menu. Download and install Lenny's Mod Loader. Make sure it's beta 8 or higher. Extract the downloaded ZIP to the LML folder. Done! Your Red Dead Redemption folder should have a folder LML which contains the all_items_menu folder. Permissions and credits Feel free to use this mod to learn how to edit the file yourself, but if you do please credit me if you learned something. I don't mind re-uploads of (parts of) this mod, but credits are appreciated. Do not just re-upload the file under any circumstances. Both this version and the one on Nexus will be the only official sources. Do not download the file from anywhere else. Thanks to @LMS for helping with the creation of the mod. Without them, this mod wouldn't be possible. Thanks to @bolmin for helping out with the Red Dead Offline mod.
-
The reason this happens is because Red Dead Offline uses the shop_items.ymt file to fix those components so that they show up when purchased. Most mods that add/replace/change clothing touch the same file, possibly overriding it. Keep an eye out for the next update that's coming soon!
- 471 comments
- 12 reviews
-
-
Update 1.1 out now! Fixes the issues with the good/bad honor grips as discussed above, and adds Saddles and more Horse customization options from MP to SP. Enjoy!
- 471 comments
- 12 reviews
-
-

- 1
-
-
Good catch -- will be added back next update. As for the Burled Grip, if that does not work there is no further troubleshooting steps at the moment, sorry! As for the people with issues purchasing the Lowry's Revolver, please check out version 1.0.2 which gets rid of the region requirements which should allow you to purchase it from any Fence.
- 471 comments
- 12 reviews
-
This page is a work-in-progress, tutorial at the bottom. Itemdatabase types There are currently 3 different known types of item database files: catalog_sp.ymt, catalog_mp.ymt and a different catalog_mp.ymt that gets loaded from Rockstar in online. For all intents and purposes, this Wiki will refer to them as SP, MP and Cloud. Basic layout The itemdatabases are built up by a few collections: pscversion Defines the PSC version, in general don't touch this itemcategories Contains all defaults associated with the database's CI_TAGs cataloglayout Associates menus and menu pages to the different shop types (ST) shopsinventories Defines requirements for items in shops on a per-shop basis intrinsicitems Unknown exactly what purpose this has effectsids Defines the UI effects that are displayed in the menus, for example weapon stats and core refills catalog Defines all individual items across all shops and inventories itempaths Defines where an item goes on purchase by defining the PATHSETs itempathsets Defines where an item goes on purchase by defining the PATHSETs itemcomponents Seemingly unused across SP and MP. UNK_MEMBER_0xA14EADD4 Unknown exactly what purpose this has UNK_MEMBER_0xCF0B6AEB Defines the manifest version, in general don't touch this bundles Multiplayer and cloud only. Defines item bundles that give multiple items on purchase awards Multiplayer and cloud only. Defines purchasable awards (refers to catalog_awards_mp) pricemodifiers Cloud only. Defines custom rates for prices in the catalog (used for weekly sales in online) itempricemodifiers Cloud only. Where pricemodifiers can define rates for items, this overrides the item price instead (used for weekly sales in online) UNK_MEMBER_0x3A4CA292 Cloud only. Links items to one or more pricemodifiers, used when an item is both discounted on cash and gold, for example (used for weekly sales in online) Catalog layouts This property refers to all menus that are associated with shops. They consist of a few basic properties at the root level: === Root === shopid Used for identifying the specific shop menu, used for linking peds to menus shoptype Defines some defaults for how the menu operates, this tells the game whether it's a catalog page or a UI menu menus Defines all menus, can contain submenus, more can be found later in the wiki pages Defines all pages across all menus, can contain links to other shop pages in certain conditions === Menus === key The key of the menu which is used as an identifier menutype The type of menu, a list of possible options can be found later in the wiki menudesc (optional) The description of the menu for the UI, displayed below the bottom line in menus hidden Self-explanatory, used to hide the menu from the UI flags (optional) Menu flags, can be 0xA089A1D2, 0x79989AAD, 0x9A976E27, 0xE5C9FB3B menus Defines all menus, can contain submenus, more can be found later in the wiki pages Defines all pages across all menus in this menu, can contain links to other shop pages in certain conditions === Pages === key The key of the page which is used as an identifier, doubles as a UI string that is used as title layout The type of page this is, can be 0x09D350D6, ADVERT_FULLPAGE, FULLPAGE_LAYOUT_1, FULLPAGE_LAYOUT_3, FULLPAGE_LAYOUT_4, FULLPAGE_LAYOUT_5, FULLPAGE_LAYOUT_6, GRID_OF_3_LAYOUT_0, GRID_OF_3_LAYOUT_1, GRID_OF_4_LAYOUT_0, INVENTORY flags (optional) Page flags, can be 0xD8134784 (MP, Unknown), 0x7EF16CBF ("All" page, will list all items in one place, can't have sub-items) items Defines all items which appears within the menus Menu types The following are the available menu types which can be used to add custom menus to your catalog files. ACTION_APPLY_POMADE Todo ACTION_CARE_HORSE Todo ACTION_CLEAN_WEAPON Todo ACTION_RENAME_HORSE Todo BOUNTY_MANAGEMENT Todo CLOTHING_MODIFY Todo CLOTHING_STAT_INFO_BOX Todo HORSE_MANAGEMENT Todo HORSE_STAT_INFO_BOX Todo ITEM_GRID Todo ITEM_LIST Todo ITEM_LIST_COLOUR_PALETTE Todo ITEM_LIST_COLOUR_PALETTE_COMBO Todo ITEM_LIST_DESCRIPTION Todo ITEM_LIST_HORSE_STATS Todo ITEM_LIST_RECIPES Todo ITEM_LIST_RPG_STATS Todo ITEM_LIST_SLIDER Todo ITEM_LIST_WEAPON_STATS Todo ITEM_SELL_LIST_HORSE_STATS Todo MENU_LIST Basic menu, contains submenus that can are used to make a button-based navigation. MENU_LIST_HORSE_STATS Same as MENU_LIST but with added previews for horse stats if the parent menu item is a horse MENU_LIST_WEAPON_STATS Same as MENU_LIST but with added previews for weapon stats if the parent menu item is a weapon MENU_STYLE_SELECTOR Todo MENU_TYPE_NONE Todo RECEIVE_MAIL_MANAGEMENT Todo REGION_LIST Todo WEAPON_MANAGEMENT Todo Adding custom menu tabs (simple) Adding menu pages to different menus is relatively intuitive, there are some quirks that you should know about, here is a simple tutorial on how to add new pages to simple menus, like the fence menus. Step 1) To begin adding custom items to menus, you will need to make sure that the item can be viewed in the catalog. To ensure this, a `requirementgroups` item is needed in the corresponding shop type's `shopsinventories` list. To do this, find the shop type you want to add an item to, and add the following entry to it. For this simple tutorial, we'll search for "<type>ST_FENCE</type>" and add the below snippet just above the "<item>WEAPON_MELEE_HATCHET</item>" item. <item> <item>AMMO_PISTOL_EXPRESS_EXPLOSIVE</item> <requirementgroups/> </item> In our case and for tutorial purposes, this will flag the explosive pistol ammo to not need any requirements. Normally, you would need the pamphlet, or certain story progression to unlock this item, but an empty requirementgroups makes it so that the item is always unlocked. This does not disable external checks. If we were, for example adding a weapon to a custom menu, we'd need to do extra work to unlock the weapon outside of the item database. Step 2) Now that we have unlocked the ability to purchase explosive pistol ammo, we'll need to add it to the ST_FENCE menu. To do this, search for "<shopid>ST_FENCE</shopid>", which will bring you to the menu that is associated with Fences around RDR. Take a little moment to familiarize yourself with the structure. Notice how there's both "menus" and "pages"? The pages property contains all individual pages across the shop, this includes special screens such as trinket crafting. The menus property contains the references to the screens, there's both the "BUY" menu and the "CRAFT" menu. We'll be wanting to focus on the "BUY" menu. In the "BUY" listing, you'll notice there's 6 pages. These correspond to the tabs in the Fence's menu. Tabs are displayed as little dots at the of the menus. If you look at each of the entries and compare them to the "global.yldb" file, you'll quickly notice that the key of each of the pages line up with text strings. An example of this is "0x338863F8", which stands for "Weapons". Each page will have a uniqe key property. If you use duplicate keys, only the first menu will be used as a reference, so make sure you choose a unique key. Keys don't have to resolve to a text string, but if they don't an empty title will be displayed. This should be fine for tabs, but you'll want to try and find a string that fits your menu. Let's add a custom menu page. Add the following to the ST_FENCE menus: <item> <key>BLIP_SUPPLIES_AMMO</key> </item> This will create a menu for the explosive round we want to add. The string "BLIP_SUPPLIES_AMMO" resolves to "Ammunition" and will be displayed at the top of our menu. Step 3) Finally, we will want to make a new page for the explosive ammo to be added to. To do this, add the following the "pages" property of the ST_FENCE: <item> <key>BLIP_SUPPLIES_AMMO</key> <layout>0x09D350D6</layout> <flags/> <items> <item> <key>AMMO_PISTOL_EXPRESS_EXPLOSIVE</key> <UNK_MEMBER_0x7D9E7571/> <linkmenuid/> </item> </items> </item> This will create a page that corresponds to the menu (notice how we now have 2 mentions of BLIP_SUPPLIES_AMMO in the file?) and add the explosive ammunition to it. If you save the file and load it with LML now, you will see that the item has been added as a tab to the menu. So, in theory we are now done! You will have made the explosive pistol ammo purchasable at the fence. Adding custom menu pages (intermediate) In the tutorial above, you've been introduced to how to add custom pages to menus. This tutorial will enhance on the concepts outline above and will refer to it. Please go and read the tutorial above if you are confused. Step 4) Now that we know how to add tabs, we can move on to adding custom pages to menus. To do this, in this tutorial, we will be adding a custom button to the Trapper menu. This involves adding a subpage to a menu of type "MENU_LIST". The menu list type is a basic menu structure that allows the player to press on a button to open a menu. For example, in the Trapper menu, you will see a couple options when you open up the Trapper's buy menu. Among them are menus to buy animal garments, misc. items, amongst others. If you look at "<shopid>ST_TRAPPER</shopid>", you will notice that the first menu is of type "MENU_LIST", whereas in our previous tutorial, we were editing a menu of type "ITEM_LIST_RPG_STATS". As you could probably tell, which type of menu you define changes how the menu works. Some menu types have certain restrictions, such as only accepting certain menu types, certain amounts of pages, etc. With the "ITEM_LIST_RPG_STATS", that limit is about 10, before the menu will become slightly buggy in that the tab navigator will get stuck past a certain point. To get around this bug, we can use a menu of type "MENU_LIST" to extend menus way past that limit. In testing, the limit of menu items that open menus seems to exceed 1000 items, so if you use this you'll be good to go! Let's start with adding a menu button that opens up a page with that same explosive ammunition. First off, we'll need to add a "requirementgroups" entry for the "ST_TRAPPER". Find "<type>ST_TRAPPER</type>", and add the below snippet just above "<item>0x036F1224</item>": <item> <item>AMMO_PISTOL_EXPRESS_EXPLOSIVE</item> <requirementgroups/> </item> Step 5) Now we'll want to edit the menu. Search for "<shopid>ST_TRAPPER</shopid>" again. We'll basically be making a copy of the "<key>0x41F87E0D</key>" menu, which in the Trapper is the "Items" section. Add the following snippet below it: <item type="0x00DA0B65"> <key>BLIP_SUPPLIES_AMMO</key> <menutype>ITEM_LIST_DESCRIPTION</menutype> <menudesc>0xEFE3B46B</menudesc> <hidden value="false"/> <flags/> <pages> <item> <key>DM_AMMO_EXPRESS_EXPLOSIVE</key> </item> </pages> <menus/> </item> Like with the Fence, you should notice that we have some keys here. Let me explain. The first "key" property is the title of the menu button. In the game it will look like "Ammunition". Below that, we have the type of the menu. In this case, since we want to display items with their descriptions, we'll use "ITEM_LIST_DESCRIPTION". Below that still is the description of the menu. This will be shown at the bottom of the screens, below a line. In this case, we'll use "RARE SHELLS" as our description. Now, here's something new, instead of directly linking our items, we need to define another page for our items. This is because the menus property is basically a big reference table to pages. So, that "DM_AMMO_EXPRESS_EXPLOSIVE" key you see there will be the name of our subpage and will be displayed at the top of the screen as a title. It will look like "Explosive" in-game. Step 6) Now that we've defined our custom menu, we'll want to define a list of items that can be displayed on it. To do this, above the page with "<key>0x954FF01D</key>", add the following snippet: <item> <key>DM_AMMO_EXPRESS_EXPLOSIVE</key> <layout>0x09D350D6</layout> <flags/> <items> <item> <key>AMMO_PISTOL_EXPRESS_EXPLOSIVE</key> <UNK_MEMBER_0x7D9E7571/> <linkmenuid/> </item> </items> </item> If you've been paying attention, you'll notice that this is almost the same as with the Fence menu, only with a different key. That's because it is! This page is a "tab" in the menu, but because we have only one tab, it's going to disable the navigation to the left and right using Q and E. Easy, right! It's the same thing, just with a different way of getting to there. Instead of using Q and E to get to the page, we'll now use "Ammunition" and be right on that page with the "Explosive" at the top with our same explosive ammo in there. You could even repeat the steps from the Fence part of this tutorial to add more tabs to the "Ammunition" menu. Just make sure to not use any duplicate keys, as this will only make the one of the two pages accessible, while we want to access all of them.
-
Changed Ped Type to Animal
-
-
-
-
-
-
-
-
-
 Can be bought from the stable in Red Dead Online.
 -
 Can be bought from the stable in Red Dead Online.
 -
Changed Character Name to "Shepherd" Virgil Edwards
-
Changed Character Name to Carmela "La Muñeca" Montez
