


379 files
-
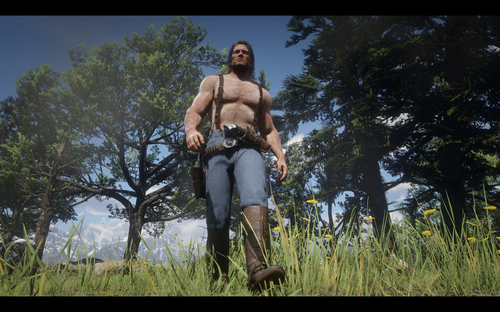 Ever wanted a comically muscular Arthur? Like so muscular it doesn't make sense for the era? So muscular he looks kind of strange with a shirt on?
Well now you can have him.
Still has some clipping around his backside with loose gunbelts, will fix in further iterations. Recommended you pair this with Jotrius' Super Punch and/or 14n001st's Numerous Quality Melee Mods for maximum immersion.
Install by dragging into the main game directory, like any other ASI file. I take no credit for the script making this magic happen, and Jakomods was the one kind enough to get the XML file I needed to get this working. I'll credit the developer the instant they ask, but for now I suspect that they would prefer to remain anonymous.
- 5,068 Downloads
- 51434 Views
- 128.86 kB File Size
- 1 Comments
 Updated
 -
.thumb.webp.d2447f0e5aa6a803b09a7dc8955144bf.webp) Blood textures replacement that i think fits better with alot more variations of splatters and blood pools,Tarantino style.
Blood textures replacement that i think fits better with alot more variations of splatters and blood pools,Tarantino style.
drop the folder into "Red Dead Redemption 2\lml"
use High Velocity ammo for more blood splatter specially on the walls,because the bullet goes trough
In order to play with Bloodlust wich is very recommended you need to delete "blooddecal" folder from Bloodlust or my mod wont work as intended.
-
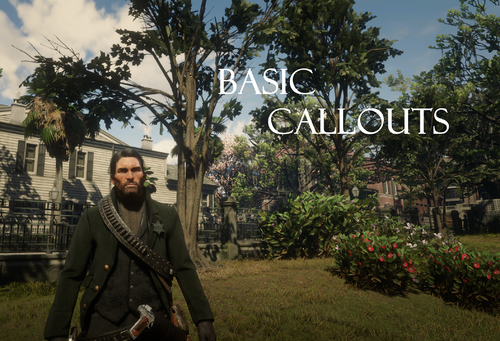 A set of basic callouts to add variety to your RDRFR experience.
The current callouts include:
Pickpocket Find the pickpocket and return the wallet to its owner Purse Snatcher Find the purse snatcher and return the purse to its owner Assault Find and talk to the victim of the assault to get the suspects location, then investigate the suspect Murder Suspect Find and talk to the witness of the murder and find the body, then investigate the suspect Rapist Find and talk to the victim to get the details of the rapist, then investigate them Wanted Suspect Find the person who saw the wanted suspect to get their description and location, then locate and deal with them Animal Cruelty Find the witness and abused animal and deal with the animal abuser Trespasser Find the trespasser and either tell them to move along or arrest them Disturbing the Peace Find and deal with a drunk suspect disturbing the peace Armed Robbery Find and interrupt the ongoing armed robbery on a civilian Escaped Prisoner Find the witness and get the description and location of an escaped prisoner Brawl Find the suspects that are fighting and deal with both of them Kidnapping Find the suspect who is taking a child against their will and deal with them accordingly
Callouts payout a variable amount depending on how serious the crime is and whether you arrest or kill the suspect. Arresting gives more money than killing.
Callouts are very basic, as the name implies. I may update it to make them more in depth if I have the time to. Callouts can currently end nine different ways with an exception to the murder callout. I mainly made this mod for myself since there isn't a lot of callouts for RDR2 but decided to share it with you all.
Known bugs:
Rarely, callouts will always give the "Disregard" message even if there are plenty of peds around and the area is populated. Restarting the game fixes it, I have only encountered it once in my play throughs
Installation
Place all files in Red Dead Redemption 2\rdrfr\plugins Start the game then go on duty -
 Version 1.0
Requires: Community Script Hook RDR2 .NET V2
Description: A simple script to slow the game down whilst playing and vice versa.
Usage: 1) Install Community Script Hook RDR2 .NET V2
2) Place all files in the zip into Red Read Redemption 2/Scripts
Default keybind is 'Y', default timescale of the mod is 0.40.
Keybind and TimeScale can be changed in Config.xml, as well as:
F3 lets you change the timescale. Enter a floating point (e.g 0.2, 0.3, 0.80)
F4 lets you change the bind. Refer to (Microsoft Key Code) for keycodes. 'Y' works, as does '89', which is also Y.
SSM.zip
-
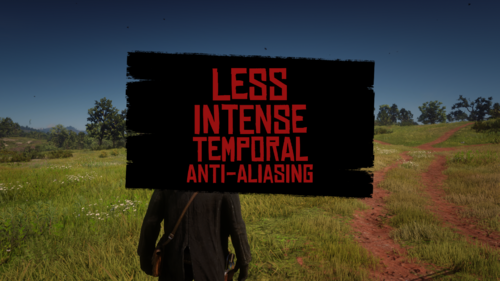 this mod makes taa less intense
---
only use 1.0.2 if you play on 1080p or lower because the aliasing is very noticeable on 1.0.1 especcialy if taa is on medium
---
CHANGELOGS:
1.0.2: made taa more intense in static and in-motion (only use on 1080p or lower)
1.0.1: reduced in-motion taa and distant taa. 28.12.2024 - like 30 minutes after release
1.0.0: release. 28.12.2024
---
taa high is better for sharpening than medium because medium will have weird sharp ghosting and will be very noticeable
(1080p is very soft without sharpening) i recommend taa high, 1/3 taa sharpening because thats what i use (image with train tracks is 50% taa sharpening)
if my mod is too flickery to you use another one on nexus like best taa mod
---
https://discord.gg/NTbsJukAhT
---
NOT COMPATIBLE WITH ANY GRAPHICS MOD!
---
- 569 Downloads
- 10857 Views
- 59.26 kB File Size
.thumb.png.e2e27f7f47ccaa0f37835bee1f3103b0.png) Eemeli2343 in MiscUpdated
Eemeli2343 in MiscUpdated -
 The general idea of Lenny's Mod Loader is to provide an easy way to modify the game. In its current state for RDR 2 it will allow you to replace any file in the game, whether they are streaming files such as models or data files, font files etc. It also includes full UI support akin to the GTA V version.
The three screenshots show replaced assets, replaced font and an altered meta file to change the police response in Valentine to Saint Denis police. These are all provided in an example download, see "Examples" further down below for more information.
Installation
1.) Copy all files from "ModLoader" into your RDR 2 game root folder so that files such as vfs.asi are in the same folder as your RDR2.exe.
2.) The Mod Manager folder can be anywhere and does not need to be inside the game folder.
3.) New mods go into lml folder or use the button "Download with Mod Manager" on the mod website if it is supported (see installation video for an example).
Beta 11 highlights - Data file merge and manifest support
A few new exciting features are part of this update. First, support for overriding files used very early during game load has been improved significantly. While I hope that this does not cause any side-effects, please let me know if mods that worked well previously no longer function correctly. For instance, it was not possible in previous versions to override the skydome textures to change the moon. Thanks to @VideoTech for testing.
Second, data file loading allows you to separate your changes to certain files, such as assets_* or metapeds into individual files so that you no longer have to modify the existing one (effectively merging them). This should make it a lot easier to create mods such as custom peds since you can contain most changes to separate files. Please note that this does not magically work for all games files but only those where the internal game parser supports additions (so no catalog for instance). In addition, custom manifest files for peds and maps are supported now. The ped support has been tested extensively, but map support will only really become useful once CodeX can generate these files for you. An example for these features is provided in the download courtesy of BHmaster.
Beta 9 highlights
Very much a maintenance update, this version hopefully fixes the random DRM integrity crashes. Thanks a lot to @calledme.kev who spent tens of hours testing various builds to find the issue! It also adds a lot of caching for collection calls that rely on read-only data, so LML should be a little less demanding.
Beta 8 highlights
This version adds a few new features such as allowing you to override the _manifest.ymf and _cache.ych files found in RPFs. Support to replace hashed files has also improved and now includes ymaps among other file types. The streaming folder now loads pso files, such as ymap, as text files, too. Most data files that are forced to be loaded as pso by the game have been patched to support being loaded as text files, such as cameras.ymt or the archetype definitions. Due to heavy refactoring to improve startup performance, previous builds are still made available. See changelog for more details.
Ymap & Ytyp support (beta 7)
This version introduces experimental support for ymap and ytyp. Two very simple examples are included that move some of the blue barrels around Valentine (check behind the saloon) via a different ymap and that make the lights inside the Saloon much brighter (ytyp - thanks to Modifiver). For ymap modifications, if you unload the imap via script and modify the file on disk, the changes will be applied on reload so no need to restart the game.
Bk2 support (beta 7)
Bink files were technically already supported in previous versions but caused some problems. In the current version they still behave somewhat differently in that they need to have two '.' in their file name as the extension '.bk2' is part of the actual file name. So name your file "movie.bk2.bk2" to make sure it gets replaced correctly. An example for replace would be "replace\movies_0\movies\filename.bk2.bk2".
Settings file (beta 7)
A settings file has been added that is to be placed in the game's root folder and called lml.ini. It is mostly geared towards developers and allows for more verbose logging output (or less..) making it easier to identify files you want to replace. If you set the log level to 0 you can see most of the game's requests to load files and it should be much easier to correctly identify the path you want to replace. Please note that many files are only loaded via hash and not via their name. You can also choose to disable the streaming and replace folders if you do not use them for added performance.
Ymt support (beta 5)
The biggest new feature in this update is the support for ymt file editing even if the source file contains unknown hashes. In order to replace a file, export the ymt to xml with OpenIV and then either use replacement via install.xml or the replace folder to replace the original file. Since you are replacing the ymt file, make sure that your file also has the ymt extension even though it contains xml. For the replace folder method you also need to match the file name. Now you can edit the file in plaintext and the game will treat it as a ymt with all names fixed up when loading. See the included examples for more information.
If you do end up finding a file where you feel that it is not properly fixed up by LML (for instance when exporting the file directly from OpenIV without any changes breaks the game), please let me know. The only file I know of that will currently cause problems is weapons.ymt, but this is not due to LML but because of an export bug in OpenIV which cuts off certain weapon flags. The High-Roller revolver example has these flags manually restored and hence works fine, but this is not the case when exported directly from OpenIV. I have notified the team and trust that they will fix this export problem in the future. Until then you will have to manually inspect the ymt, gather the flags and restore them manually in the xml for weapons if you plan to use them. Please note that this requires advanced knowledge of game structures.
Ymt Examples
This download comes with extensive examples courtesy of @Modifiver that modify various aspects of the game. Check them out in the included examples folder and copy them to your lml folder to try them out!
Upgrading from earlier LML versions without install.xml support (beta 2 and earlier)
This version of Lenny's Mod Loader introduces install.xml files to instruct LML on how to load your mods. Thus, mods can be separated in folders and no longer require nested folder structures. This is a proven concept from our GTA V version and has now been ported over. You can still use the replace and stream folder under your lml folder. Please note, however, that the Mod Manager UI will only pick up mods that use the new install.xml system so it is recommended to convert your mods to the new system. Only mods using install.xml support Download with Mod Manager. Consult the examples below to learn how to use the new system.
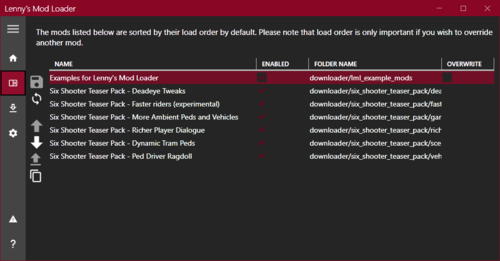
Examples
You can find more examples by @Modifiver here:
https://www.rdr2mods.com/downloads/rdr2/mods/80-modifivers-six-shooter-teaser-pack/
More examples with detailed documentation on the new install.xml system can be found here:
https://www.rdr2mods.com/downloads/rdr2/mods/77-examples-for-lennys-mod-loader/
Verify your file got replaced
If you feel that your file is not being replaced properly, have a look at the log file and see if you can find any entry related to it. Perhaps the path was not correct and hence it did not work. Search for "replaced" for files in replace and "adding" for files in stream.
Support
Since this is the first release for RDR I expect there to be quite a few problems and certain files might not work as expected. If you have trouble replacing specific files, please do not hesitate to comment here or reach out and include your modified file and file structure so I can have a look.
Installation Video
Please find a detailed installation video including a guide through our examples here (thanks to @Gan Ceann)
Detailed explanation of stream vs replace (older versions)
In the lml folder you can find two subfolders, one called "replace" and one called "stream". Both can be used for the same thing but replace is ultimately more powerful, but also more advanced. The stream folder you might recognize from Map Editor or Rampage Trainer and just loads streaming files directly.
Stream
As mentioned, similar to other tools available this merely loads streaming files into the game when the game is loading. For instance, model or texture files would go in there and will replace the existing assets in the game. If you do not know the name of an asset, but only its hash, simply name it 0xhash.ext (e.g. 0x9E54B506.ytd for w_melee_machete01+hi.ytd) and it will still be recognized and replace the asset correctly.
This is the most convenient way to quickly replace streaming files as you do not have to worry about where in the game files they are located but only their name.
Replace
This folder creates a virtual mapping of the entire game file structure and hence allows you to replace any game file, granted you know its full location. This is similar to the paths you can see in OpenIV when navigating RPFs, but not exactly the same. If you want to change the dispatch.meta file for instance, you will need to modify it in update.rpf, as the one in common.rpf is superseded by that. To do that, you would create the following structure: "replace\update\common\data\dispatch.meta". This is exactly the path you would use in OpenIV (without the .rpf ending for update). Now, whenever the game wants to access this file, it will load yours instead. It is that simple!
If you want to replace the font file font_lib_efigs.gfx in scaleform_frontend.rpf for instance, you would create the following structure: "replace\update\x64\patch\data\cdimages\scaleform_frontend\font_lib_efigs.gfx".
Word of caution: File paths do not always match their RPF names unfortunately, hence this is a bit more advanced but also allows greater control. Say you want to replace player_zero_coat_001_open.ydd which is present in both packs_1.rpf (original) and dlc.rpf (from patchpack001, an update to the file). Files DLCs follow a slightly different pathing scheme. The full path to this file would be "replace\dlc_patchPack001\x64\packs\base\models\component_models\player_zero_coat_001_open.ydd". As you can see, it does not match the file path directly, which is also why for many files using the stream folder is just simpler. This is because the game maps some files differently and when you open the dlc.rpf (in patchpack001) and its setup2.xml you will see why: the device name is dlc_patchPack001 which is the "root" of all files inside this archive. Thus the path starts at "dlc_patchPack001" and then follows the RPF structure until you arrive at "replace\dlc_patchPack001\x64\packs\base\models\component_models\player_zero_coat_001_open.ydd". Not that complicated, but certainly not as easy as the streaming folder and something to look out for.
Acknowledgements
Thanks to NTA for his work on fwEvents, hooking, fiDevice and sysAllocator
Thanks to listener for his work on fiDevice and advice over the years (hope you are well!)
Thanks to the OpenIV team for OpenIV
Thanks to dexyfex for CodeWalker
Thanks to Gan Ceann, Will and GameRoll for testing as well as Jewels, GuiCORLEONEx794, jack.sharif and Modifiver for providing example assets
-
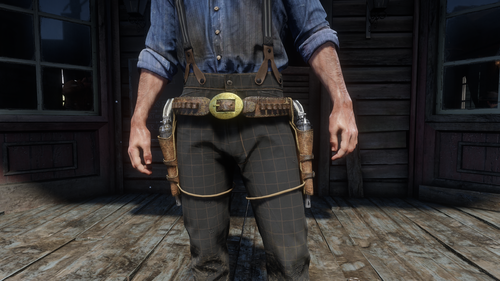 Dual Arthur’s original holster and a dual Gambler holster. Requires Remove Satchel and Remove Knife Sheath mods.
To install extract inside main RDR 2 folder.
To merge assets_drawable.ymt (WhyEm uses this file):
1. Delete assets_drawable.ymt file from this mod
2. Open assets_drawable.ymt file from another mod with text editor (notepad)
3. Press CTRL+F
4. Search for player_zero_holster_cup_000 and delete COMPONENT_HOLSTERS text that is a few lines below it
5. Search for player_zero_holster_cup_009 and delete COMPONENT_HOLSTERS text that is a few lines below it
6. Search for player_zero_holster_front_cup_000 and delete COMPONENT_HOLSTERSLEFT text that is a few lines below it
7. Save the file
Version 1.1:
-removed Delete key function
-minor change to the holstering animation
-added Gambler holster
- 4,515 Downloads
- 31701 Views
- 2.81 MB File Size
- 2 Comments
 Updated
 -
 Replaces Arthur’s original holster, Gambler holster, Nuevo Paraiso holster and Upgraded holster.
To merge assets_drawable.ymt (WhyEm uses this file):
1. Delete assets_drawable.ymt file from this mod
2. Open assets_drawable.ymt file from another mod with text editor (notepad)
3. Press CTRL+F to open search window (search for the hashed names in the brackets if un-hashed names are not found)
4. Search for player_zero_holster_cup_000 (0x737D98EF) and delete COMPONENT_HOLSTERS (0xDA59F244) text that is a few lines below it
5. Search for player_zero_holster_cup_004 (0x6FC08772) and delete COMPONENT_HOLSTERS (0xDA59F244) text that is a few lines below it
6. Search for player_zero_holster_cup_009 (0x4F26CFEA) and delete COMPONENT_HOLSTERS (0xDA59F244) text that is a few lines below it
7. Search for player_zero_holster_cup_013 (0xB2CF8FAE) and delete COMPONENT_HOLSTERS (0xDA59F244) text that is a few lines below it
8. Search for player_zero_holster_front_cup_000 (0xC8ECC9A2) and delete COMPONENT_HOLSTERSLEFT (0xFF123945) text that is a few lines below it
9. Save the file
Requires lml. To install extract inside lml folder.
Version 1.1:
-removed .asi script
-added Gambler holster, Nuevo Paraiso holster and Upgraded holster
- 1,119 Downloads
- 14641 Views
- 1.88 MB File Size
- 1 Comments
Updated -
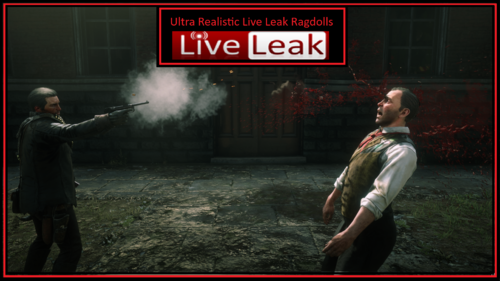 This mod is inspired by ultra-realistic "LiveLeak-style" gunshot reactions. Personally, I don’t enjoy such content, but I know there are some players who want a mod like this. So, I’ve done my best to recreate it authentically, drawing inspiration from LiveLeak footage.
Features
NPCs rarely stumble anymore. When an NPC is hit by a bullet, they often go into shock and collapse to the ground. The time NPCs stay on the ground after being hit but before getting up (if still alive) has been slightly increased. NPCs remain alive and responsive while on the ground if they still have health. Headshots cause NPCs to collapse instantly. The bullet impact force is minimal, so NPCs are no longer thrown back dramatically when hit. NPCs are less likely to clutch their wounds when hit while standing.
For even greater realism, it is recommended to use PDO (Ped Damage Overhaul) in combination with this mod.
IMPORTANT NOTE
Throwing knives and pistols share the same ragdoll settings, meaning NPCs will stumble less when hit by throwing knives. As this mod only includes the physicstasks.ymt file to ensure maximum compatibility with other mods, I’m unable to address this limitation.
INSTALLATION
Just copy the "Ultra Realistic Live Leak Ragdolls" folder to you "lml" folder. Make sure that this is the only active ragdoll mod.
-
.thumb.png.b26a7add4fe4e82a36bd2160fff1bc02.png) Main File: Mexican Poncho, has clipping and it is unfixable
Main File: Mexican Poncho, has clipping and it is unfixable
Optional File: Javier's Poncho, has clipping and broken physics and is unfixable
Changelogs:
1.1.2 Fixed Black Poncho Bugs
1.1.1 Fixed The Crash On The Loading Screen
1.0.1 Added Javier's Poncho Only Option, This version is broken and crashes the game
Unfixable "Issues" Javier's Poncho Physics, Clipping
Please Join My Discord For Bug Reports And Access To My Smaller Projects
https://discord.gg/NTbsJukAhT
This will not be updated because it has no issues to what i know of and i will maybe make update if i get new idea for a poncho
This Mod Is Only Posted On RDR2Mods.com anywhere else it's a repost, report them if you "want to"
Credits:
TheRealJohnModding: For Making Unhashed Necessities, because i used that mod's shop_items.ymt as a base for this mod
why do people even like wearing these things in red dead
- 11,269 Downloads
- 80151 Views
- 25.94 MB File Size
- 23 Comments
Updated -
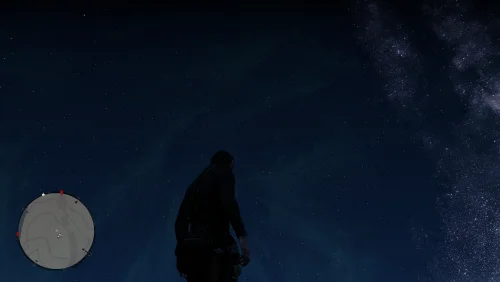 DISCLAIMER: I TAKE NO CREDIT FOR THIS WHATSOEVER
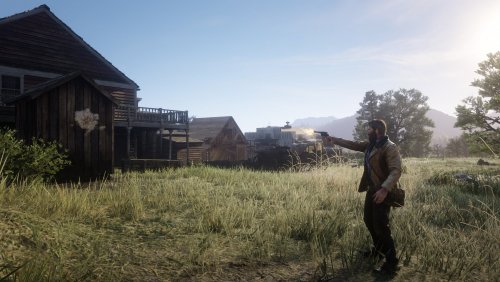
The night sky in the early 1900s would be much denser than is portrayed by the stock version of the game. If you've ever been outside of a major city before, you'll know that Red Dead 2's star density is disappointing.
I took the dark nights mod by Alsharad and modified a few lines in each of the weather/w_ files in the timecycle folder. The results are great. I made a reddit thread about it. I got the initial values by someone on RDR2 Mods Discord. Again, I take no credit for this mod whatsoever, I am simply putting it out there.
The Milky Way strip is exaggerated for sure, and I'm not sure that there's anything that can be done about that. However, I feel it's overall worth it for the sake of the rest of the night sky.
If the screenshots don't demonstrate the difference clearly enough, I uploaded a video from when I only had the "High Pressure" weather file modified:
-
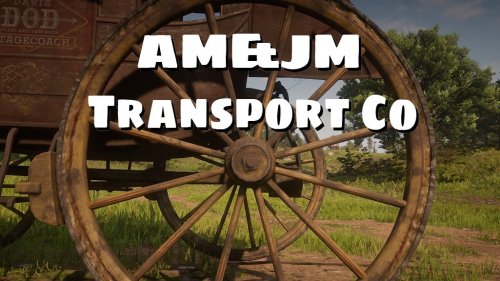 Buy your own customizable wagon, stagecoach or boat and transport people or goods all over the west to make an honest living (AND MORE).
Main features in short:
- Buy your own customizable wagon, stagecoach or boat. (Hot air balloon and "portable" Maxim Gun is also available to buy)
- Earn money by taking jobs at general stores, hotels or saloons, and transport goods or people all over the map, including every town and 46 minor locations.
- Find gang hideouts and retrieve stolen cargo or wagons from them. (the hideouts are added by the mod, not the vanilla ones)
- Protect your goods or passengers from random bandit attacks during jobs (with optional random bandit attacks outside of jobs).
- Work as a bounty hunter, capture criminals dead or alive.
- Hire people to work for you, drive your wagon or provide protection against the dangers of the road.
- Work on your ranch at Beecher's Hope and transport your goods to Blackwater, Armadillo or Tumbleweed to sell them for a handsome profit.
- Deliver special hunting / fishing requests for butchers.
- Zombies, because everything is better with zombies... (disabled by default)
Buy your own customizable wagon, stagecoach or boat:
Go to the general store in any town, approach and target the owner for the "Jobs / Wagons / Boats" prompt to come up.
The menu should come up where you can chose from several wagons, stagecoaches or boats. After choosing one, leave the store and find the wagon or boat outside to customize it. There you can confirm your purchase or go back to the store to chose another one.
Once you own a wagon or boat you can change it's customization options or store it any time at the store.
If your boat or wagon is not nearby or missing it's horses you can repair and recover it for a fee at general stores. Recovering your wagon during a job will fail the job.
However, if you wreck it, it'll be gone for good and you need to buy a new one.
Wagon / boat menu: Press the hotkey while you're sitting in your wagon or boat, or hold the key for a second while standing near them to bring up the menu.
- You can open your weapon locker from the wagon menu.
- You can switch between your saved custom outfits, so you can change your clothes or weapons without your horse being nearby.
- It lets you make some changes to your wagon on the fly, like adding / removing lights.
- You can store / unpack your maxim gun if you own one.
Steam boats have a 'get on board' option that'll make your hired guns get on board.
The hotkey is not bind by default, find the "WAGON_MENU_KEY" option in the ini to set it.
When you buy a wagon it spawns in somewhat of a remote location to avoid spawning on top of something else, a yellow wagon wheel icon shows it's location on your world map if you're not sure where to find it.
Boats:
There are some teleport zones near a few bridges that'll put you from one side of the bridge to the other, so you can traverse some rivers with boats you couldn't otherwise.
You can sail to Guarma if you own a boat by traveling north up river. The "Sail to Guarma" prompt should come up shortly after you passed Annesburg. (I only tested it in the epilogue, I don't know if it causes any issues if you travel there earlier in the story)
There's an "auto forward" function for boats so you don't have to keep pressing the forward key the whole time. It's disabled by default. You have to set BOAT_FORWARD_KEY in the ini to whatever key you use as forward for boats. After that, a forward prompt should appear when you're in a boat.
It's a script that just presses a key on your keyboard, and it'll be pressed even if you alt+tab out of the game, so make sure to stop your boat before you alt+tab or close the game...
Delivery jobs:
You can also find delivery jobs at general stores.
There are two types:
- "Supply delivery jobs" where you need to use your own wagon to transport things.
- "Wagon driver jobs" where you get a job wagon that you need to take. (you can't use your own wagon for this type)
Both types has "deliver" and "fetch" versions.
"Deliver" means you load your wagon where you started the assignment and deliver it to a destination.
"Fetch" means you go to a different place, load your wagon there and bring the supplies back to where you started the job.
How a delivery job is done:
When you accept a job you'll see a blip on your map marking the place where you have to load the supplies into your wagon. You'll also see a wagon wheel icon for your job wagon if it's that type of job. Park your wagon nearby and the prompt to load your wagon should come up.
After that, a new blip should mark the place you're supposed to deliver the goods. Drive your wagon there and use the prompt to unload you wagon. The job is completed at this point, you can talk to the store owner at your destination to pick up your payment, or pick it up later at a train station / post office. (you get a few bucks more if you pick it up in person)
Passenger transport jobs:
You can find these jobs in hotels / saloons (same as above, approach and target the owner / barkeep).
There are also two types:
- "Passenger transport jobs" where you have to use your own stagecoach.
- "Stagecoach driver jobs" where you use a borrowed stagecoach for the job. (can't use your own)
You might have to stop at minor locations to drop off or pick up passengers on your way to your destination. You can customize how many stops you want in the ini.
How a stagecoach job is done:
Once you accepted the job find your passengers (they're usually upstairs, check your map for blips). They should follow you to your stagecoach and get in with you.
A blip on your map should mark your destination. If the job has multiple stops the blip will mark the first stop. Once you're there, the prompt to confirm the destination should show up. If there are more stops a blip on your map will show the next stop. It goes like this until you're at the final destination.
At each stop some passengers will get off, and there might be new ones to pick up. You can take your payment from every passenger one by one at their destination (stand close and target them for the prompt). They'll only hang around for a short time, if you don't take their payment you'll be able to pick it up later at a post office / train station in any town. (They give you a few extra bucks if you take it from them in person)
Recover stolen cargo / stolen wagon jobs:
You can find these type of jobs in general stores.
Just like the other job, there is two type:
- Recover cargo using your own wagon.
- Recover stolen wagon (no need to own a wagon)
How a recovery job is done:
Go to the hideout marked on your map. Once you engaged the bandits in combat, getting too far from the objective will fail the job - they'll get away with the goods (but also for technical reasons).
After you dealt with the bandits, park your wagon near the spot and use the prompt to load the cargo. If you're recovering a stolen wagon you still have to load it, too.
As optional side objectives you might find hostages to rescue or wanted bandits to capture. Bring them back with you dead or alive to earn some extra cash (alive pays more, especially for the hostages...).
Head back and unload the goods at the store you started at, and take your payment from the owner.
There are a random amount of bandits at each hideout, larger ones can have up to 20 of them, so make sure you're up for the task!
Delivery jobs using boats
...are pretty much the same as the wagon ones. You have to get out of your boat and stand on the shore to load / unload the cargo.
Recover stolen cargo by boat:
You need to own a tugboat for these jobs. Sail out and find the pirate ship on the Lanahassee river. Kill them and 'park' your boat next to theirs. Get on board the pirate ship for the "transfer the cargo to your boat" prompt to come up. After that return the cargo and unload it at your starting location.
Sometimes you can come across "Wanted pirates" you can bring back dead or alive for a small extra profit.
Failing a job usually results in having to compensate your employer for the trouble you caused.
Jobs don't persist when you quit the game, but exiting the game during a job doesn't count as failing them either (no fine).
Beecher's Hope:
Instead of selling your goods by magically making them disappear, actually drive the wagon to town to sell them for extra profit.
There's a wagon on the ranch that's being used to transport the goods (if you don't know which one just start doing the chores and you'll see). While you're near the back of this wagon the "job menu" will come up, listing all the chores around the ranch.
Every chore you complete before selling the goods will increase the payment you'll get - even unrelated ones like chopping wood.
Once you loaded two egg crates and two milk jugs on the wagon the "Sell goods" option will be available in the menu (but you can keep doing chores for more profit).
Once you selected the 'Sell goods' option you can chose to sell them at Blackwater, Armadillo or Tumbleweed. The farther location you chose, the more money you'll get.
Once you're there, unload the cargo, talk to the shopkeeper to get your payment then return the wagon to the ranch to finish the job.
You can do it once a day, the job resets every midnight, whether you finished it or not.
Bounty Hunting:
Find the sheriff (wherever he is) or talk to a deputy in the sheriff's office / police station to take these jobs. (In any town except for Van Horn and Armadillo)
Find the target, bring them back by any means, then talk to the sheriff / deputy to get your reward.
Sometimes the target is wanted *alive*, you'll fail these jobs if the target dies. (Even if wanted dead or alive, you get a small bonus if you bring them back alive).
Sometimes the target will try to flee while their allies fight you . Their icon only shows up on the map if they close to you so make sure you don't lose sight of them.
If you bring them back alive you have to put them into a cell then the deputy will give you your reward. If dead, just throw them anywhere in the building, target the deputy, open the jobs menu and select 'complete job' to get your reward.
There are high reward and low reward bounty jobs:
The high reward ones will take you to gang hideouts with up to 20 or so bandits.
The low reward ones will take you to a smaller group of bandits (4-6), that'll you'll find either in a small campsite or travelling around on horse, on foot, or in a wagon. If they have a wagon, bringing it back to the sheriff's office will earn you a little extra reward.
Pirate Hunting:
Pretty much the same as bounty hunting, only you'll find your target on a boat on the Lanahassee river. You don't need to own a boat for these jobs, just return the target any way you can. (though you might sink if you use a vanilla boat, the mod only prevents you owned boats from sinking in deep water)
Hunting / Fishing jobs:
You can find special hunting requests at any butcher.
You need to deliver the actual animal unless it's specifically says 'pelt' or 'skin'.
To deliver you need to drop the requested animals on the ground near the butcher and press 'Deliver' in the menu. Animals you're about to sell should be listed on the deliver page.
Things you hold in your hands or stowed on your horse will NOT be sold (to prevent accidentally selling things you don't mean to).
Normally these requests change every day. Pressing 'accept job' will prevent the requests from changing until you delivered or cancelled the job. (Otherwise you can deliver stuff without accepting the job first, it's just to prevent the requests changing while you're out hunting)
You can deliver as many requested animals as you want (multiple ones of the same type too), but once you delivered, the requests will change so make sure everything you want to sell is listed before you hit 'Deliver'.
They'll pay a little extra for better quality (except for fish, couldn't figure out how to do that yet..)
Bandits:
There's a chance that a random group of bandits will attack you during jobs. Be prepared and watch your back! Customizable in the ini.
There are also 24 bandit hideouts added by the mod, with 15+ bandits. Some jobs will take you to them but you can also find them outside of jobs.
There are also ini options to enable random bandit attacks outside of jobs, and random roaming bandits outside of jobs, who'll not attack you just go about their own business.
Hired Guns:
Hire people who'll travel with you and (try to) protect you from bandits (or anything else). To do so, talk to the barkeep in any saloon.
You can hire random people or you can customize their looks and weapons to your liking.
Hired Guns will not fight while in a town.
Story characters are also available.
- You can use the 'Rest & Recover' option in the menu that will teleport your hired guns to you in case you got separated, they'll be cleaned and their hats and weapons will be recovered if they lost them.
- They automatically go into "sneak and hold fire" mode while you're crouching / sneaking outside of combat.
- If the "Allow revive" option is enabled, instead of dying then can go down into an injured state and they can be revived by crouching close to them until the 'Help' prompt fills up (10 seconds)
- Making hired guns drive:
Target them and use the "You drive" prompt. Put down a custom waypoint on the map to make them drive there. Deleting the waypoint will make them stop. Use the 'speed up' and 'slow down' hotkeys to change their driving speed (up arrow and down arrow by default).
Their driving skills are ok-ish, generally they'll find their way from point A to point B, but sometimes they can take a wrong turn... Also, they can't really turn around.
If you're sitting next to them, you can take away / give back the control with the 'switch seats' key, should be 'Z' on keyboard. Make sure you stop them (slow down key until they're fully stopped) before you take away the control, or they might bug out.
- Using the 'Wait for signal' command will make them stay and don't do anything until you signal to them by whistling.
-The 'Ride with me' command will prevent them from spawning in their own horse. If there's another free horse around they'll use that, but if not they'll ride with you on your horse.
Commands menu: You can also give commands to them through their command menu, Numpad 1-3 keys by default.
The command menu has some extra commands:
- Aim at person while the menu is up: Attack target, lasso target
- Aim at dead / hogtied person: pick up target
- Aim at horse: put carried body on horse
- Aim at downed hired gun: help up (it'll take them the same amount of time as for you)
Buyable Maxim Gun:
You can buy it in gun stores.
You can pick up the gun and carry it around by standing close to it and holding the reload key for a second or so.
You can also put it down by holding the reload key. Holding the attack key (left mouse) while you're putting it down will snap it to the ground, in case it keeps falling over.
You can store it on your wagon or boat using the wagon / boat menu, and you can also buy extra ammo that you can store on your wagon / boat. To store it, it needs to be close to the wagon.
Right now storing the gun or simply putting it down next to the wagon will reload it from the wagon's ammo stash.
Zombies:
They're disabled by default, you can enable them in the ini or in the debug menu (see below).
There are some options in the ini to customize them, like how many should spawn, how aggressive they should be during the day or night, or for them to burst into flames when they die just for the spectacle.
Sheriffs in towns will pay 5$ for every undead you hunt down and bring back to them. For a corpse to count they have to be nearby in the back of your wagon, stowed in your main or temporary horse (with the icon, not just any horse), or carried by you in hand.
They won't spawn while you're in a town.
Pick up you payment / pay your fines at train stations / post offices.
If you didn't pick up your payment in person after completing a job or you have a fine to pay you can do it at train stations / post offices. Only in towns, might change later.. Walk up to a station clerk and target them for the prompt to come up.
Banking:
You can store your money in banks to keep your hard earned cash safe, or take a loan to buy a wagon and start your business.
Stored money will earn you 0.5% interest a day. Loans will be added to your bounty (with an added fine) if you don't pay it back in time.
You can set in the ini if you want to get jobs to New Austin or not. (turned on by default)
Major locations with job givers:
Valentine - General store (job, wagon), Hotel (job), Saloon (hiring), Sheriff's office(bounty), Butcher (hunting), Train station (payment)
Strawberry - General Store (job, wagon), Welcome center (job), Sheriff's office(bounty), Butcher (hunting), Post office (payment)
Rhodes - General store (job, wagon), Saloon (job, hiring), Sheriff's office(bounty), Butcher (hunting), Train Station (payment)
Saint Denis - General Store (job, wagon, boat), Saloon (job), Bar (hiring), Police station(bounty), Butcher (hunting), Train Station (payment)
Van Horn - Store/Fence (job, wagon, boat), the Depot (where you can rent a room - job, payment), Saloon (hiring)
Annesburg - Gunsmith (job, wagon, boat), Train station (job, payment), Sheriff's office(bounty),
Blackwater - General store (job, wagon , boat), Saloon (job, hiring), Sheriff's office(bounty), Butcher (hunting), Train station (payment)
Armadillo - General store (job, wagon), Saloon (job, hiring)
Tumbeweed - General store (job, wagon), Saloon (job, hiring), Butcher (hunting), Sheriff's office(bounty)
Lagras - Store (job, boat)
There are also 51 other minor locations in the mod that are only job destinations with no job givers, 36 gang hideouts and many minor bandit campsites.
Debug / cheat menu:
Open the debug menu by holding down the Wagon menu key for a couple seconds while on foot.
Set the hotkey in the ini - WAGON_MENU_KEY. You can also disable the debug menu in the ini.
- Respawn wagon: Let's you respawn the wagon you own with horses - in case it spawned in without horses. You have to be near the wagon.
- Respawn Boat.
- Respawn Hired Guns: Respawns all your hired guns and teleports them to you, in case you lost them somehow.. It *might* help if they stopped following or bugged out in some other way.
- Remove fine - in case you failed a job due to a bug.
- Select Job Destination: If enabled, you can select destinations for any job by pressing the left and right key in the job menu.
- Trigger random attack.
- Despawn all bandit hideouts: In case they're in the way during a story mission or something...
- Reset Hideout Spawn Cooldown: Normally once you attack a hideout it won't spawn again for a while. This resets the cooldown so they spawn again even if you just cleared them out.
- Enable zombies
- Teleport to main land: If you travel to Guarma and somehow get stuck there you can use this to teleport back to Annesburg.
Known issues:
-The revive mechanic for hired guns is incompatible with some mods that change NPC health, it will cause them to start dying right after they're spawed in. You can disable it in the ini if you're experiencing issues.
- You can't return bounties alive to the Rhodes sheriff office before chapter 4. You can still return them dead though.
- The "mount up" command for hired guns can be wonky. The game handles their horses spawning in and it can take a while sometimes. They also won't mount up while you're sitting in a vehicle, so if you want them to follow your wagon on horseback, wait for them to get on their horses before you get into your wagon.
Installation:
Download AM&JMTransport.rar, extract it and drop the files into your Red Dead Redemption 2 game folder.
You're going to need Script Hook By Alexander Blade.
https://www.dev-c.com/rdr2/scripthookrdr2/
Credits: Some of the "own a wagon" part of the code was straight lifted from opsedar's Stash That Wagon mod. Big thanks for him for all his work and especially for open sourcing them ❤️
-
 Fixes the Timer "Message" Bug R* caused during the last blood money dlc
Installation:
Drop the lml folder in your main rdr2 directory.
- 1,726 Downloads
- 15130 Views
- 1.49 kB File Size
- 2 Comments
 EnergiDaan in MiscUpdated
 -
.thumb.png.43567234faf1d65a898828d9720bfd17.png) Best TAA and Visual Effects is intended primarily for players who play the game with an upscale of 1.5, 1.75 or higher (in the game settings) Also works great using DSR and DLDSR technologies. Or use real 2k/4k monitors!
Best TAA and Visual Effects is intended primarily for players who play the game with an upscale of 1.5, 1.75 or higher (in the game settings) Also works great using DSR and DLDSR technologies. Or use real 2k/4k monitors!
Big update v.1.6.0 Changes below:
✔️Reflections from water have been reworked (now objects are reflected more clearly: trees, hills, houses).
✔️Improved glare from water (especially at night).
✔️Improved SSDO screen space occlusion (SSAO).
✔️Other minor improvements.
✔️Still the same vanilla performance, without loss of FPS. 💪🏋💯
Big update v.1.5.0 Changes below:
✔️Added terrain tessellation.
✔️Improved water glare, foam and its physical behavior.
✔️Other small improvements.
Big update v.1.3.0 Changes below:
✔️Now the best volumetric reflections from clouds.
✔️Improved tessellation of water surface.
✔️Thanks to: Cazanu We now have an incredibly beautiful Milky Way constellation, which I included in this update. Now in the Wild West there are stunningly beautiful nights in 8k resolution!
✔️Improved the quality of all reflections from water and puddles.
✔️Water glare has been adjusted.
✔️Improved foam near the ocean shores.
Advantages:
✔️FPS + -absolutely the same as in the stock version of the game (But the difference is calasal)
✔️The mod is fully compatible with the mod: "Visual Redemption" https://www.razedmods.com/red-dead-redemption-ii by Razed. You should simply delete the "visualsettings.dat" file from the "Visual_Redemption" folder in your LML directory.
✔️This TAA fix is equal in quality to anti-aliasing: MSAA 2x. At the same time, it is much more productive!
✔️Higher rendering of objects at all distances in the game
✔️Trees now have more volume
✔️Higher terrain detail
✔️Very flexible TAA sharpening scale (If you want a less sharp image, you should decrease TAA sharpness)
✔️Better detail for pedestrians and animals
✔️People and horses now spawn at long distances
✔️Grass quality at all distances in the game has a clearer outline
Now you no longer need texture packs with high-poly objects that will cause frame rate drops when using a not-so- expensive graphics card, or have texture loading before your eyes! I also recommend you use my free ReShade Preset:
Through extensive testing and tweaking, I was able to increase the draw distance of objects, especially trees. Also the distance of the appearance of pedestrians, horses and other objects at a greater distance. If you're playing on PC, remember that people and animals used to be downloaded over long distances, with the latest Rockstar updates, this thing is broken. This add-on will help solve the problem.
Attention! This assembly is an early version and may have some bugs, treat it with understanding!
WARNING: 👇The screenshots use my own preset for ReShade: "Red Dead Vision", details on my server 👇
Subscribe to my Discord server: https://discord.gg/BbavTG7 to follow and stay updated!
Flaws:
❌Some people may find these settings too sharp (However, people who like a clear picture and know how to play with scaling will be delighted with the detail)
INSTALLATION METHOD:
unpack the entire contents of the archive into the"lml"folder.
WARNING: At the start of the game, you should have an option on the tab: "TAA Antialiasing"set to"High".
If you already have a file: "visualsettings.dat" in the LML package, then the mod may not work! Therefore, before installation, you need to delete the file with the same name.
Buddy, if you like these settings, leave your approval and your vote!
You can leave your wishes in the comments 🙂
- 22,234 Downloads
- 114972 Views
- 108.85 kB File Size
- 13 Comments
 Updated
 -
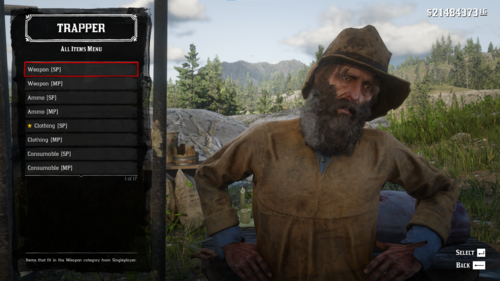 All items unlocked and purchasable
Now fully compatible with Red Dead Offline! Make sure this mod overrides Red Dead Offline and you'll be good to go. Without Red Dead Offline installed, certain Multiplayer weapons will not be unlocked for purchase, in addition to making me sad that you didn't install it. Get it here!
In this mod, changes are made to the catalog to allow you to buy and and all items without requirements. This is done by manually going through the catalog file and removing the restrictions put on the items that are locked, by adding them all to a custom menu at the Trapper.
In addition, this makes every item always purchasable at Tailors, Newspaper Boys, General Stores, Trappers, Doctors, Pearson and the Bait store. This means that you can unlock items from those stores whenever you want. Newspaper Boys, for example, always sell every single issue of their newspaper, Trappers allow you to purchase the outfit before having crafted all individual pieces, Pearson allows you craft without needing the Crafting Tools from the Ledger, Tailors allow you to purchase all outfits from anywhere, and more. This functionality is intentionally not made available when customizing guns, at stables and at various barber shops, including the Camp Shaving kit. This is to prevent serious bugs from happening.
This adds a custom menu to the Trappers around the world that allows you to buy any item. Adds multiple categories to the menu you can use. The mod adds a dedicated All Items Menu option in which all options are located. Some pages allow you to use Q and E to browse tabs within them. Please note that due to a limitation in the game, the tab indicated (the little circles) stop updating past a certain point, but the menus still work. Items that are normally not available for purchase have been given a purchase price of $0.01, while any item that already had a purchase price has been left untouched and will cost the same.
NEW! In addition to the new custom menu at Trappers, this mod also allows you to sell any item that's located in your satchel by selling them to a Fence. Think documents, key items, unique items, and more. All items that are not intended to be sold will not give you cash for selling them. Any item with an original selling price has been left untouched and will sell for the same everywhere.
IMPORTANT: Purchasing or selling items that are obviously not intended to be used in gameplay either by being cut or not intended to be purchased or sold may have lasting and unforeseen consequences on your save file. I have intentionally left everything in there so that you can have fun experiencing what would happen if you got or removed certain items early, et cetera, but this means there is a very real chance that progression using your save game may be permanently broken. If you are worried about purchasing or selling something that may break your game, do not buy items that are free, are sold for free, have missing text, or display anything weird.
BACK UP YOUR SAVE, YOU HAVE BEEN WARNED!
Installation
Back up your save. There is a very real possibility your save will become damaged by using certain options in the menu. Download and install Lenny's Mod Loader. Make sure it's beta 8 or higher. Extract the downloaded ZIP to the LML folder. Done! Your Red Dead Redemption folder should have a folder LML which contains the all_items_menu folder. Permissions and credits
Feel free to use this mod to learn how to edit the file yourself, but if you do please credit me if you learned something. I don't mind re-uploads of (parts of) this mod, but credits are appreciated. Do not just re-upload the file under any circumstances. Both this version and the one on Nexus will be the only official sources. Do not download the file from anywhere else.
Thanks to @LMS for helping with the creation of the mod. Without them, this mod wouldn't be possible.
Thanks to @bolmin for helping out with the Red Dead Offline mod.
-
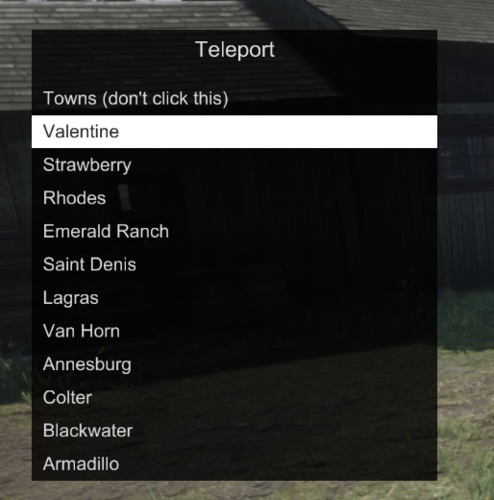 This is my edited Ist.ini file for Lenny's Simple Trainer !
I added everthing i have found here: www.mod-rdr.com/wiki/pages/ and everything what's added from other users there.
Whats inside the file:
- Full Charakters list
- Full Peds list
- Full Weapons list
- Full Horses list
- Full Vehicles list
- Many Teleport Locations (inclusive some "Out Of Map" - you should have at least a fly mod for proper use.)
- Many Actions (like drinking coffee)
Known issues:
- Because of RDR2 updates, the mod can cause unwanted behavior to the game, expect random crashes and or being stuck somehow
- Spawned legendarys will be not recognized as legendarys. You will get perfect pelts/skin only.
Installation:
- Install Lenny's Simple Trainer and everything mentioned there
- Drag the Ist.ini in your Red Dead Redemption 2 root folder
Credits: LMS for Lenny's Simple Trainer,
NetSSH for his actions list
- 87,563 Downloads
- 350974 Views
- 183.42 kB File Size
- 96 Comments
 Aaskereija in MiscUpdated
 -
 Yet another very simple mod removing the bullet trail when firing weapons. Drag the file into your game folder and enjoy. Please note that you need to have an ASI loader for this mod to work.
I have not tested this mod much (< 5 minutes), so if something else breaks, please let me know.
Please don't upload or redistribute this mod, link here instead so that everyone has the most up to date version.
-
 Experience true spaghetti western with this euphoria physics overhaul mod that recreates RDR 1's physics from the ground up and adds a bunch of new additions.
Ever since GTA 5 was released, the euphoria physics have been a major downgrade compared to games like MP3, GTA IV and RDR 1. RDR 2's euphoria physics have improved a ton, but it still feels very repetitive and rather boring.
(If you want to download older versions of W.E.R.O, you can get them in my discord server)
FEATURES:
• No Air Restriction when flying super fast during ragdoll & RDR 1 like falling gravity
• Every weapon and ammo type will affect differently on how the NPC will react (WEAPONS.YMT REQUIRED)
• RDR 1 Falling Reactions. Falling behaviors are fluid and flexible, allowing more variety
• RDR 1 like gunshot reactions. NPCs no longer stumble to the same direction and they spin when shot in the shoulder area. They also react dynamically and gunshot reactions are fluid
• RDR 1 Rolling Reactions. No more rigid movements!
• Advanced InjuredOnGround behaviour. The NPC will reach for the exact wound where they have been shot on instead of reaching for the stomach all the time
• More improved and diversified legshot reactions. NPC's will stumble or fall depending on the bullet/weapon (WEAPONS.YMT REQUIRED)
• Improved On Fire behaviors. NPCs stumble in agonizing pain
• Every single shotgun affects differently on how the NPC will react and the NPCs now spin more violently (WEAPONS.YMT REQUIRED)
• Improved behaviors when bailing out of a wagon
• RDR 1 like knockout reactions
• Improved the NPC reactions caused by arrows and added different behaviors to other arrow types (WEAPONS.YMT REQUIRED)
• Alternative versions! Want the deaths feeling more realistic? Want realism mixed with fun? I got you! Versions such as Instant Drop On Headshot and Fall To Knees On Death (or both combined) will give you exactly that!
• Improved explosion behaviors & distance of flight when near an explosion
Compatible with: Ped Damage Overhaul, Red Dead Offline, WhyEm's DLC, 1899 Firearms and All Shots Cause Bleedouts & basically any mod at this point (excluding mods that use physicstasks.ymt). WILL REQUIRE VERSION.DLL (Lenny's Asi Loader) AND W.E.R.O - AUTOMATIC COMPATIBILITY PATCH, if you have a mod conflicting with W.E.R.O's weapons.ymt file.
A massive thanks to LMS, Bolmin & Senexis for letting me use some of their Red Dead Offline files! Without them, i wouldn't be able to implement different reactions to every weapon and ammo type into this mod
Massive thanks to the following mod authors for letting me add compatibility to their mod/agreeing on a merge:
WickedHorseMan
WhyEm
Maverick
Also huge thanks to AnymYo for a lot of the discoveries made so that I can bring you the most advanced mod to date. A lot of struggle went through making and continuing to make this mod to fit your preferences and to give you more options, so if you like my mod, definitely consider endorsing and perhaps providing feedback and letting me know what you like the most about W.E.R.O. Thanks for downloading! This mod wouldn't be possible without you guys and AnymYo for helping me crack the file and unlock it's full potential! The amount of support you show to this mod definitely means a lot to me and pushes me to continue this project! Thanks again
If you want to, you can:
Join my DISCORD server to stay up to date with latest early update previews and more
Download my wero mod for GTA 5 as well: https://bit.ly/2QZNO6V
For realism, I recommend using the latest Ped Damage Overhaul mod that has added support for euphoria mods and i also recommend using All Shots Cause Bleedouts mod (or any other blood mod like BloodLust by WhyEm or Center Mass by walrus159). Make sure that the EuphoriaModInstalled value is set to 1 in PDO so you can have the best experience possible
and much much more that gives the game a more satisfying feel when killing enemies or falling and rolling
How to install this mod into your game
Just drag and drop the WERO folder in your LML folder. IF the mod doesn't work, make sure you have the latest ScriptHook, ASI Loader by Lenny and a properly installed LML. Make sure you don't have any other mods that have the physicstasks.ymt file.
REQUIRED: LENNY'S MOD LOADER & SCRIPT HOOK
Hope you enjoy this mod!
Thanks to all my Patreon supporters for participating in making this mod better and better:
Jack Fisher
Myles Brown
Catfish
Ole Kristian Tveit
AidenNapalm
Sloot.
Julien Lecleire
UAEXAE
Prodigii
Abizhey
Joe Ray
Roy Luo
NotBatman
joel Davey
Madoks Filek
Pokker-Gamer
El Morty
martin gustafsson
Fer Bueno
Ta'Quan Anthony
Miguel Lefebvre-Sabourin
Rex._.
Tim Tran
Jason Schaefer
Tristan Darden-Lawrence
Braylan
Stephen Killam
Abizhey
Like what I do?
Consider supporting me on Patreon!
- 69,021 Downloads
- 269543 Views
- 6.02 MB File Size
- 30 Comments
 VolaticWolf in MiscUpdated
 -
 This mod makes the nights darker and more realistic. It also gets rid of the vignette effect.
There are 3 files.
Darker = Very dark (Like the screenshots)
Light = Slightly brighter
Lighter = Even more bright but still much darker than vanilla
Install:
Extract and place the 'dark_nights' folder into 'lml' folder.
Lenny's Mod Loader is required!
-
 This mod gives your horse the ability to fly
Note: This mod is mainly designed to be used with a controller and does not work well with keyboard and mouse.
Controls are mostly the same as normal horse controls.
Controls (Xbox controller)
Press LS to start/stop flying X to move up B to move down A to speed up RB to slow down/stop LS to turn left/right RS (camera) to pitch up/dow Press RS for super speed (really buggy)
Controls (PS Controller)
Press L3 to start/stop flying Square to move up Circle to move down X to speed up R1 to slow down/stop L3 to turn left/right R3 (camera) to pitch up/down Press R3 for super speed (really buggy)
Controls (Keyboard/Mouse)
O to start/stop flying Shift to speed up L CTRL to slow down/stop Space to move up Mouse (camera) to control direction
Installation
Install Scripthook RDR2 from Alexander Blade if you don't already have it
Copy flying_horse_mod.asi into your RDR 2 installation directory
Source code: https://github.com/gudmunduro/rdr2-flying-horse
- 1,004 Downloads
- 7517 Views
- 148 kB File Size
 Updated
 -
 A simple ASI Loader for Red Dead Redemption 2 to easily load your custom code into the game.
Files are loaded after Arxan has finished its decryption stage so you can search for your favorite patterns right away!
Installation
Put version.dll in your game root folder. When the game launches, you should hear a few beeping sounds indicating that it got loaded.
Not supported for RDR Online. Remove the ASI Loader file (version.dll) before playing Online.
Native fixes (build 1436)
Game build 1436 on July 13 2021 removed a few natives used mostly for text rendering making any mod using those crash. The ASI Loader update 0.2 fixes that by re-implementing the following natives with their original hashes. You still need a script hook!
DISPLAY_TEXT
SET_TEXT_COLOR
SET_TEXT_CENTRE
SET_TEXT_SCALE
SET_TEXT_DROPSHADOW
TASK_EVERYONE_LEAVE_VEHICLE
Let me know if any of those do not work as expected. Thanks to fingaweg for their help.
Uploaded for www.mod-rdr.com, please do not upload it anywhere else.
-
 Experience the fastest draw in the Wild West, you'll never be the same cowboy again!
Press "X" to use QuickDraw!
If you want a more complete experience download QUICKDRAW IMMERSION V2.2!
- 3,063 Downloads
- 22385 Views
- 101.86 kB File Size
 Updated
 -
.thumb.png.85eee36f9e16b9ede6863e0105415ddb.png)
- 301 Downloads
- 15477 Views
- 400.84 kB File Size
- 1 Comments
 WesternGamer in MiscUpdated
 -
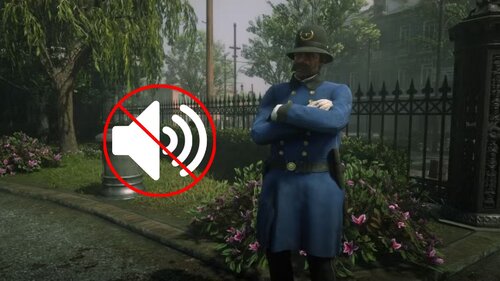 This mod removes the whistle sound effect used by the police in Saint Denis when you are wanted.
This mod requires Lenny's Mod Loader. To install drag and drop the 'No Police Whistle Sound' folder inside your lml folder.
- 169 Downloads
- 128770 Views
- 2.19 kB File Size
 generatedmax in MiscUpdated
 -
- 1,327 Downloads
- 18482 Views
- 1.07 MB File Size
- 1 Comments
 Updated